HA的2种部署方式
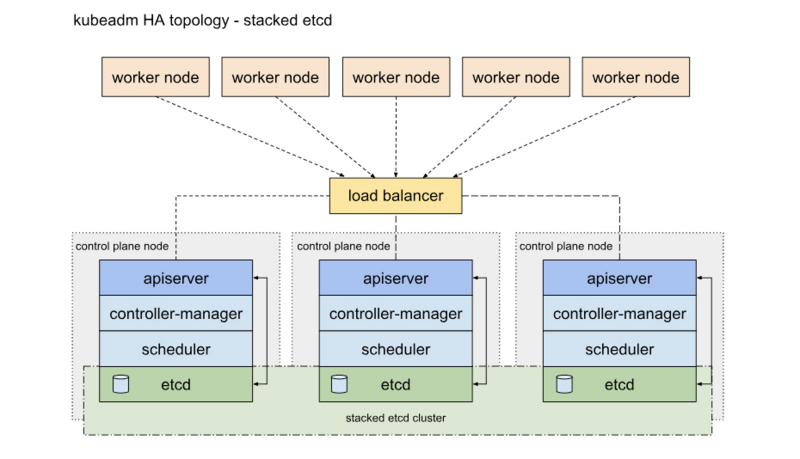
一种是将etcd与Master节点组件混布在一起
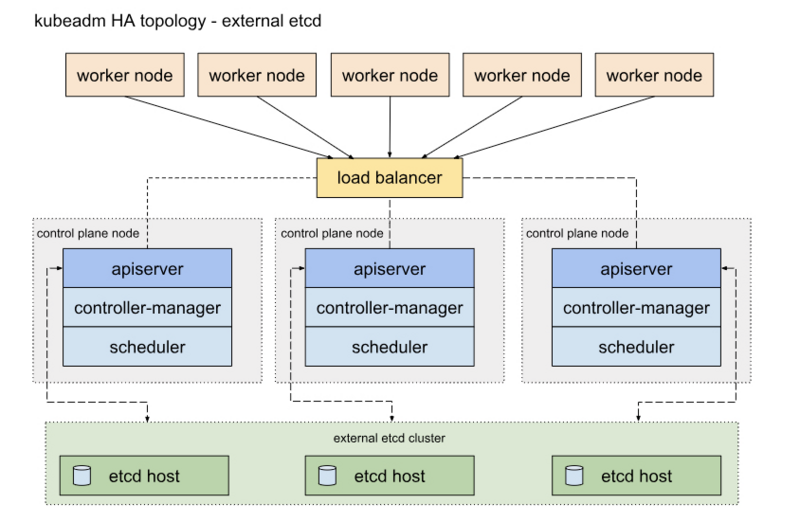
另外一种方式是,使用独立的Etcd集群,不与Master节点混布
本章是用第一种叠加式安装的
通过kubeadm搭建一个高可用的k8s集群,kubeadm可以帮助我们快速的搭建k8s集群,高可用主要体现在对master节点组件及etcd存储的高可用,文中使用到的服务器ip及角色对应如下:
192.168.200.3 master1
192.168.200.4 master2
192.168.200.5 master3
192.168.200.6 node1
192.168.200.7 node2
192.168.200.8 node3
192.168.200.16 VIP
删除host信息
/etc/hosts这行也删除掉 ::1 localhost localhost.localdomain localhost6 localhost6.localdomain6
1、各节点下载docker源
# step 1: 安装必要的一些系统工具
sudo yum install -y yum-utils device-mapper-persistent-data lvm2
# Step 2: 添加软件源信息
sudo yum-config-manager --add-repo https://mirrors.aliyun.com/docker-ce/linux/centos/docker-ce.repo
# Step 3
sudo sed -i 's+download.docker.com+mirrors.aliyun.com/docker-ce+' /etc/yum.repos.d/docker-ce.repo
# Step 4: 更新并安装Docker-CE
sudo yum makecache fast
sudo yum -y install docker-ce
# Step 4: 开启Docker服务
sudo service docker start

# 注意:
# 官方软件源默认启用了最新的软件,您可以通过编辑软件源的方式获取各个版本的软件包。例如官方并没有将测试版本的软件源置为可用,您可以通过以下方式开启。同理可以开启各种测试版本等。
# vim /etc/yum.repos.d/docker-ce.repo
#   将[docker-ce-test]下方的enabled=0修改为enabled=1
#
# 安装指定版本的Docker-CE:
# Step 1: 查找Docker-CE的版本:
# yum list docker-ce.x86_64 --showduplicates | sort -r
#   Loading mirror speeds from cached hostfile
#   Loaded plugins: branch, fastestmirror, langpacks
#   docker-ce.x86_64            17.03.1.ce-1.el7.centos            docker-ce-stable
#   docker-ce.x86_64            17.03.1.ce-1.el7.centos            @docker-ce-stable
#   docker-ce.x86_64            17.03.0.ce-1.el7.centos            docker-ce-stable
#   Available Packages
# Step2: 安装指定版本的Docker-CE: (VERSION例如上面的17.03.0.ce.1-1.el7.centos)
# sudo yum -y install docker-ce-[VERSION]
2、各节点安装docker服务并加入开机启动
yum -y install docker-ce
systemctl start docker && systemctl enable docker
3、各节点配置docker加速器并修改成k8s驱动
daemon.json文件如果没有自己创建
sudo mkdir -p /etc/docker
sudo tee /etc/docker/daemon.json <<-'EOF'
{
  "registry-mirrors": [
    "https://hub.uuuadc.top",
        "https://docker.anyhub.us.kg",
        "https://dockerhub.jobcher.com",
        "https://dockerhub.icu",
        "https://docker.ckyl.me",
        "https://docker.awsl9527.cn"
  ],
  "exec-opts": ["native.cgroupdriver=systemd"],
  "log-driver": "json-file",
  "log-opts": {
    "max-size": "100m"
  },
  "storage-driver": "overlay2",
  "storage-opts": [
    "overlay2.override_kernel_check=true"
  ]
}
EOF
4、重启docker服务
systemctl daemon-reload
systemctl restart docker
5、更改各节点主机名
hostnamectl set-hostname 主机名
6、配置各节点hosts文件
[root@master1 ~]# cat /etc/hosts
127.0.0.1   localhost localhost.localdomain localhost4 localhost4.localdomain4
::1         localhost localhost.localdomain localhost6 localhost6.localdomain6

192.168.200.3 master1
192.168.200.4 master2
192.168.200.5 master3
192.168.200.6 node1
192.168.200.7 node2
192.168.200.8 node3
7、关闭各个节点防火墙
systemctl stop firewalld && systemctl disable firewalld
8、关闭各节点SElinux
[root@master1 ~]# cat /etc/selinux/config

# This file controls the state of SELinux on the system.
# SELINUX= can take one of these three values:
#     enforcing - SELinux security policy is enforced.
#     permissive - SELinux prints warnings instead of enforcing.
#     disabled - No SELinux policy is loaded.
SELINUX=disabled        # 改成disabled
# SELINUXTYPE= can take one of three two values:
#     targeted - Targeted processes are protected,
#     minimum - Modification of targeted policy. Only selected processes are protected.
#     mls - Multi Level Security protection.
SELINUXTYPE=targeted
9、关闭各节点swap分区
[root@master1 ~]# cat /etc/fstab

#
# /etc/fstab
# Created by anaconda on Wed Dec 30 15:01:07 2020
#
# Accessible filesystems, by reference, are maintained under '/dev/disk'
# See man pages fstab(5), findfs(8), mount(8) and/or blkid(8) for more info
#
/dev/mapper/centos-root /                       xfs     defaults        0 0
UUID=7321cb15-9220-4cc2-be0c-a4875f6d8bbc /boot                   xfs     defaults        0 0
#/dev/mapper/centos-swap swap                    swap    defaults        0 0         # 注释这行
临时关闭
swapoff -a && sudo sed -i '/ swap / s/^\(.*\)$/#\1/g' /etc/fstab
10、重启服务器
reboot
11、同步各节点的时间
timedatectl set-timezone Asia/Shanghai
chronyc -a makestep
12、各节点内核调整,将桥接的IPv4流量传递到iptables的链
cat > /etc/sysctl.d/k8s.conf << EOF
net.bridge.bridge-nf-call-ip6tables = 1
net.bridge.bridge-nf-call-iptables = 1
net.ipv4.ip_nonlocal_bind = 1
net.ipv4.ip_forward = 1
net.ipv6.conf.all.disable_ipv6 = 1
EOF

sysctl -p /etc/sysctl.d/k8s.conf
执行命令验证是否生效
sysctl -a | grep net.ipv4.ip_forward
13、配置各节点k8s的yum源
cat <<EOF > /etc/yum.repos.d/kubernetes.repo
[kubernetes]
name=Kubernetes
baseurl=https://mirrors.aliyun.com/kubernetes/yum/repos/kubernetes-el7-x86_64/
enabled=1
gpgcheck=1
repo_gpgcheck=1
gpgkey=https://mirrors.aliyun.com/kubernetes/yum/doc/yum-key.gpg https://mirrors.aliyun.com/kubernetes/yum/doc/rpm-package-key.gpg
EOF
setenforce 0
14、各节点安装ipset服务(如果使用iptables 请忽略这步)
yum -y install ipvsadm ipset sysstat conntrack libseccomp
15、各节点开启ipvs模块(如果使用iptables 请忽略这步)
cat > /etc/sysconfig/modules/ipvs.modules <<EOF
     #!/bin/sh
     modprobe -- ip_vs
     modprobe -- ip_vs_rr
     modprobe -- ip_vs_wrr
     modprobe -- ip_vs_sh
     modprobe -- nf_conntrack_ipv4
EOF
chmod 755 /etc/sysconfig/modules/ipvs.modules && bash /etc/sysconfig/modules/ipvs.modules && lsmod | grep -e ip_vs -e nf_conntrack_ipv4
16、所有master节点安装haproxy和keepalived服务
yum -y install haproxy keepalived
17、修改master1节点keepalived配置文件
[root@master1 ~]# cat /etc/keepalived/keepalived.conf
! Configuration File for keepalived

global_defs {
   router_id LVS_DEVEL

# 添加如下内容
   script_user root
   enable_script_security
}


vrrp_script check_haproxy {
    script "/etc/keepalived/check_haproxy.sh"         # 检测脚本路径
    interval 3
    weight -2
    fall 10
    rise 2
}


vrrp_instance VI_1 {
    state MASTER            # MASTER
    interface ens33         # 本机网卡名
    virtual_router_id 51
    priority 100             # 权重100
    advert_int 1
    authentication {
        auth_type PASS
        auth_pass 1111
    }
    virtual_ipaddress {
        192.168.200.16      # 虚拟IP
    }
    track_script {
        check_haproxy       # 模块
    }
}
18、修改master2节点keepalived配置文件
[root@master2 ~]# cat /etc/keepalived/keepalived.conf
! Configuration File for keepalived

global_defs {
   router_id LVS_DEVEL

# 添加如下内容
   script_user root
   enable_script_security
}


vrrp_script check_haproxy {
    script "/etc/keepalived/check_haproxy.sh"         # 检测脚本路径
    interval 3
    weight -2
    fall 10
    rise 2
}


vrrp_instance VI_1 {
    state BACKUP            # BACKUP
    interface ens33         # 本机网卡名
    virtual_router_id 51
    priority 99             # 权重99
    advert_int 1
    authentication {
        auth_type PASS
        auth_pass 1111
    }
    virtual_ipaddress {
        192.168.200.16      # 虚拟IP
    }
    track_script {
        check_haproxy       # 模块
    }
}
19、修改master3节点keepalived配置文件
[root@master3 ~]# cat /etc/keepalived/keepalived.conf
! Configuration File for keepalived

global_defs {
   router_id LVS_DEVEL

# 添加如下内容
   script_user root
   enable_script_security
}


vrrp_script check_haproxy {
    script "/etc/keepalived/check_haproxy.sh"         # 检测脚本路径
    interval 3
    weight -2
    fall 10
    rise 2
}


vrrp_instance VI_1 {
    state BACKUP            # BACKUP
    interface ens33         # 本机网卡名
    virtual_router_id 51
    priority 98            # 权重98
    advert_int 1
    authentication {
        auth_type PASS
        auth_pass 1111
    }
    virtual_ipaddress {
        192.168.200.16      # 虚拟IP
    }
    track_script {
        check_haproxy       # 模块
    }
}
20、三台master节点haproxy配置都一样
[root@master1 ~]# cat /etc/haproxy/haproxy.cfg
#---------------------------------------------------------------------
# Example configuration for a possible web application.  See the
# full configuration options online.
#
#   http://haproxy.1wt.eu/download/1.4/doc/configuration.txt
#
#---------------------------------------------------------------------

#---------------------------------------------------------------------
# Global settings
#---------------------------------------------------------------------
global
    # to have these messages end up in /var/log/haproxy.log you will
    # need to:
    #
    # 1) configure syslog to accept network log events.  This is done
    #    by adding the '-r' option to the SYSLOGD_OPTIONS in
    #    /etc/sysconfig/syslog
    #
    # 2) configure local2 events to go to the /var/log/haproxy.log
    #   file. A line like the following can be added to
    #   /etc/sysconfig/syslog
    #
    #    local2.*                       /var/log/haproxy.log
    #
    log         127.0.0.1 local2

    chroot      /var/lib/haproxy
    pidfile     /var/run/haproxy.pid
    maxconn     4000
    user        haproxy
    group       haproxy
    daemon

    # turn on stats unix socket
    stats socket /var/lib/haproxy/stats

#---------------------------------------------------------------------
# common defaults that all the 'listen' and 'backend' sections will
# use if not designated in their block
#---------------------------------------------------------------------
defaults
    mode                    http
    log                     global
    option                  httplog
    option                  dontlognull
    option http-server-close
    option forwardfor       except 127.0.0.0/8
    option                  redispatch
    retries                 3
    timeout http-request    10s
    timeout queue           1m
    timeout connect         10s
    timeout client          1m
    timeout server          1m
    timeout http-keep-alive 10s
    timeout check           10s
    maxconn                 3000

#---------------------------------------------------------------------
# main frontend which proxys to the backends
#---------------------------------------------------------------------
frontend  kubernetes-apiserver
    mode                        tcp
    bind                        *:16443
    option                      tcplog
    default_backend             kubernetes-apiserver

#---------------------------------------------------------------------
# static backend for serving up images, stylesheets and such
#---------------------------------------------------------------------
listen stats
    bind            *:1080
    stats auth      admin:awesomePassword
    stats refresh   5s
    stats realm     HAProxy\ Statistics
    stats uri       /admin?stats

#---------------------------------------------------------------------
# round robin balancing between the various backends
#---------------------------------------------------------------------
backend kubernetes-apiserver
    mode        tcp
    balance     roundrobin
    server  master1 192.168.200.3:6443 check
    server  master2 192.168.200.4:6443 check
    server  master3 192.168.200.5:6443 check
21、每台master节点编写健康监测脚本
[root@master1 ~]# cat /etc/keepalived/check_haproxy.sh
#!/bin/sh
# HAPROXY down
A=`ps -C haproxy --no-header | wc -l`
if [ $A -eq 0 ]
then
systmectl start haproxy
if [ ps -C haproxy --no-header | wc -l -eq 0 ]
then
killall -9 haproxy
echo "HAPROXY down" | mail -s "haproxy"
sleep 3600
fi

fi
22、给脚本增加执行权限
chmod +x check_haproxy.sh
23、启动keepalived和haproxy服务并加入开机启动
systemctl start keepalived && systemctl enable keepalived
systemctl start haproxy && systemctl enable haproxy
24、查看vip IP地址
[root@master1 ~]# ip a
1: lo: <LOOPBACK,UP,LOWER_UP> mtu 65536 qdisc noqueue state UNKNOWN group default qlen 1000
    link/loopback 00:00:00:00:00:00 brd 00:00:00:00:00:00
    inet 127.0.0.1/8 scope host lo
       valid_lft forever preferred_lft forever
    inet6 ::1/128 scope host
       valid_lft forever preferred_lft forever
2: ens33: <BROADCAST,MULTICAST,UP,LOWER_UP> mtu 1500 qdisc pfifo_fast state UP group default qlen 1000
    link/ether 00:0c:29:4e:4c:fe brd ff:ff:ff:ff:ff:ff
    inet 192.168.200.3/24 brd 192.168.200.255 scope global noprefixroute ens33
       valid_lft forever preferred_lft forever
    inet 192.168.200.16/32 scope global ens33        # 虚拟IP
       valid_lft forever preferred_lft forever
    inet6 fe80::9047:3a26:97fd:4d07/64 scope link noprefixroute
       valid_lft forever preferred_lft forever
3: docker0: <NO-CARRIER,BROADCAST,MULTICAST,UP> mtu 1500 qdisc noqueue state DOWN group default
    link/ether 02:42:dc:dd:f0:d7 brd ff:ff:ff:ff:ff:ff
    inet 172.17.0.1/16 brd 172.17.255.255 scope global docker0
       valid_lft forever preferred_lft forever
25、每个节点安装kubeadm,kubelet和kubectl # 安装的kubeadm、kubectl和kubelet要和kubernetes版本一致,kubelet加入开机启动之后不手动启动,要不然会报错,初始化集群之后集群会自动启动kubelet服务!!!
yum install -y --nogpgcheck kubelet kubeadm kubectl
systemctl enable kubelet && systemctl daemon-reload
26、获取默认配置文件
kubeadm config print init-defaults > kubeadm-config.yaml
27、修改初始化配置文件
cat kubeadm-config.yaml

apiVersion: kubeadm.k8s.io/v1beta3
bootstrapTokens:
- groups:
  - system:bootstrappers:kubeadm:default-node-token
  token: abcdef.0123456789abcdef
  ttl: 24h0m0s
  usages:
  - signing
  - authentication
kind: InitConfiguration
localAPIEndpoint:
  advertiseAddress: 192.168.200.3     # 本机IP
  bindPort: 6443
nodeRegistration:
  criSocket: /var/run/dockershim.sock
  imagePullPolicy: IfNotPresent
  name: master1  # 本主机名
  taints:
  - effect: NoSchedule
    key: node-role.kubernetes.io/master
---
apiServer:
  timeoutForControlPlane: 4m0s
apiVersion: kubeadm.k8s.io/v1beta3
certificatesDir: /etc/kubernetes/pki
clusterName: kubernetes
controlPlaneEndpoint: "192.168.200.16:16443"    # 虚拟IP和haproxy端口
controllerManager: {}
dns: {}
etcd:
  local:
    dataDir: /var/lib/etcd
imageRepository: registry.aliyuncs.com/google_containers    # 镜像仓库源要根据自己实际情况修改
kind: ClusterConfiguration
kubernetesVersion: 1.23.0
networking:
  dnsDomain: cluster.local
  podSubnet: "10.244.0.0/16"  #新增
  serviceSubnet: 10.96.0.0/12
scheduler: {}

---
apiVersion: kubeproxy.config.k8s.io/v1alpha1
kind: KubeProxyConfiguration
mode: ipvs
28、下载相关镜像
[root@master3 ~]# kubeadm config images pull --config kubeadm-config.yaml
W0131 18:44:21.933608   25680 strict.go:55] error unmarshaling configuration schema.GroupVersionKind{Group:"kubeadm.k8s.io", Version:"v1beta3", Kind:"ClusterConfiguration"}: error unmarshaling JSON: while decoding JSON: json: unknown field "type"
[config/images] Pulled registry.aliyuncs.com/google_containers/kube-apiserver:v1.23.0
[config/images] Pulled registry.aliyuncs.com/google_containers/kube-controller-manager:v1.23.0
[config/images] Pulled registry.aliyuncs.com/google_containers/kube-scheduler:v1.23.0
[config/images] Pulled registry.aliyuncs.com/google_containers/kube-proxy:v1.23.0
[config/images] Pulled registry.aliyuncs.com/google_containers/pause:3.6
[config/images] Pulled registry.aliyuncs.com/google_containers/etcd:3.5.1-0
[config/images] Pulled registry.aliyuncs.com/google_containers/coredns:v1.8.6
29、初始化集群
[root@master1 ~]# kubeadm init --config kubeadm-config.yaml
W1231 14:11:50.231964  120564 configset.go:202] WARNING: kubeadm cannot validate component configs for API groups [kubelet.config.k8s.io kubeproxy.config.k8s.io]
[init] Using Kubernetes version: v1.18.2
[preflight] Running pre-flight checks
        [WARNING IsDockerSystemdCheck]: detected "cgroupfs" as the Docker cgroup driver. The recommended driver is "systemd". Please follow the guide at https://kubernetes.io/docs/setup/cri/
        [WARNING SystemVerification]: this Docker version is not on the list of validated versions: 20.10.1. Latest validated version: 19.03
[preflight] Pulling images required for setting up a Kubernetes cluster
[preflight] This might take a minute or two, depending on the speed of your internet connection
[preflight] You can also perform this action in beforehand using 'kubeadm config images pull'
[kubelet-start] Writing kubelet environment file with flags to file "/var/lib/kubelet/kubeadm-flags.env"
[kubelet-start] Writing kubelet configuration to file "/var/lib/kubelet/config.yaml"
[kubelet-start] Starting the kubelet
[certs] Using certificateDir folder "/etc/kubernetes/pki"
[certs] Generating "ca" certificate and key
[certs] Generating "apiserver" certificate and key
[certs] apiserver serving cert is signed for DNS names [master1 kubernetes kubernetes.default kubernetes.default.svc kubernetes.default.svc.cluster.local] and IPs [10.96.0.1 192.168.200.3 192.168.200.16]
[certs] Generating "apiserver-kubelet-client" certificate and key
[certs] Generating "front-proxy-ca" certificate and key
[certs] Generating "front-proxy-client" certificate and key
[certs] Generating "etcd/ca" certificate and key
[certs] Generating "etcd/server" certificate and key
[certs] etcd/server serving cert is signed for DNS names [master1 localhost] and IPs [192.168.200.3 127.0.0.1 ::1]
[certs] Generating "etcd/peer" certificate and key
[certs] etcd/peer serving cert is signed for DNS names [master1 localhost] and IPs [192.168.200.3 127.0.0.1 ::1]
[certs] Generating "etcd/healthcheck-client" certificate and key
[certs] Generating "apiserver-etcd-client" certificate and key
[certs] Generating "sa" key and public key
[kubeconfig] Using kubeconfig folder "/etc/kubernetes"
[endpoint] WARNING: port specified in controlPlaneEndpoint overrides bindPort in the controlplane address
[kubeconfig] Writing "admin.conf" kubeconfig file
[endpoint] WARNING: port specified in controlPlaneEndpoint overrides bindPort in the controlplane address
[kubeconfig] Writing "kubelet.conf" kubeconfig file
[endpoint] WARNING: port specified in controlPlaneEndpoint overrides bindPort in the controlplane address
[kubeconfig] Writing "controller-manager.conf" kubeconfig file
[endpoint] WARNING: port specified in controlPlaneEndpoint overrides bindPort in the controlplane address
[kubeconfig] Writing "scheduler.conf" kubeconfig file
[control-plane] Using manifest folder "/etc/kubernetes/manifests"
[control-plane] Creating static Pod manifest for "kube-apiserver"
[control-plane] Creating static Pod manifest for "kube-controller-manager"
W1231 14:11:53.776346  120564 manifests.go:225] the default kube-apiserver authorization-mode is "Node,RBAC"; using "Node,RBAC"
[control-plane] Creating static Pod manifest for "kube-scheduler"
W1231 14:11:53.777078  120564 manifests.go:225] the default kube-apiserver authorization-mode is "Node,RBAC"; using "Node,RBAC"
[etcd] Creating static Pod manifest for local etcd in "/etc/kubernetes/manifests"
[wait-control-plane] Waiting for the kubelet to boot up the control plane as static Pods from directory "/etc/kubernetes/manifests". This can take up to 4m0s
[apiclient] All control plane components are healthy after 14.013316 seconds
[upload-config] Storing the configuration used in ConfigMap "kubeadm-config" in the "kube-system" Namespace
[kubelet] Creating a ConfigMap "kubelet-config-1.18" in namespace kube-system with the configuration for the kubelets in the cluster
[upload-certs] Skipping phase. Please see --upload-certs
[mark-control-plane] Marking the node master1 as control-plane by adding the label "node-role.kubernetes.io/master=''"
[mark-control-plane] Marking the node master1 as control-plane by adding the taints [node-role.kubernetes.io/master:NoSchedule]
[bootstrap-token] Using token: abcdef.0123456789abcdef
[bootstrap-token] Configuring bootstrap tokens, cluster-info ConfigMap, RBAC Roles
[bootstrap-token] configured RBAC rules to allow Node Bootstrap tokens to get nodes
[bootstrap-token] configured RBAC rules to allow Node Bootstrap tokens to post CSRs in order for nodes to get long term certificate credentials
[bootstrap-token] configured RBAC rules to allow the csrapprover controller automatically approve CSRs from a Node Bootstrap Token
[bootstrap-token] configured RBAC rules to allow certificate rotation for all node client certificates in the cluster
[bootstrap-token] Creating the "cluster-info" ConfigMap in the "kube-public" namespace
[kubelet-finalize] Updating "/etc/kubernetes/kubelet.conf" to point to a rotatable kubelet client certificate and key
[addons] Applied essential addon: CoreDNS
[endpoint] WARNING: port specified in controlPlaneEndpoint overrides bindPort in the controlplane address
[addons] Applied essential addon: kube-proxy

Your Kubernetes control-plane has initialized successfully!

To start using your cluster, you need to run the following as a regular user:

  mkdir -p $HOME/.kube
  sudo cp -i /etc/kubernetes/admin.conf $HOME/.kube/config
  sudo chown $(id -u):$(id -g) $HOME/.kube/config

You should now deploy a pod network to the cluster.
Run "kubectl apply -f [podnetwork].yaml" with one of the options listed at:
  https://kubernetes.io/docs/concepts/cluster-administration/addons/

You can now join any number of control-plane nodes by copying certificate authorities
and service account keys on each node and then running the following as root:

  kubeadm join 192.168.200.16:16443 --token abcdef.0123456789abcdef \
    --discovery-token-ca-cert-hash sha256:f0489748e3b77a9a29443dae2c4c0dfe6ff4bde0daf3ca8740dd9ab6a9693a78 \
    --control-plane

Then you can join any number of worker nodes by running the following on each as root:

kubeadm join 192.168.200.16:16443 --token abcdef.0123456789abcdef \
    --discovery-token-ca-cert-hash sha256:f0489748e3b77a9a29443dae2c4c0dfe6ff4bde0daf3ca8740dd9ab6a9693a78
30、集群初始化失败重置集群
kubeadm reset
31、在其它两个master节点创建以下目录
mkdir -p /etc/kubernetes/pki/etcd
32、把主master节点证书分别复制到其他master节点
scp /etc/kubernetes/pki/ca.* root@192.168.200.4:/etc/kubernetes/pki/
scp /etc/kubernetes/pki/sa.* root@192.168.200.4:/etc/kubernetes/pki/
scp /etc/kubernetes/pki/front-proxy-ca.* root@192.168.200.4:/etc/kubernetes/pki/
scp /etc/kubernetes/pki/etcd/ca.* root@192.168.200.4:/etc/kubernetes/pki/etcd/
scp /etc/kubernetes/admin.conf root@192.168.200.4:/etc/kubernetes/
scp /etc/kubernetes/pki/ca.* root@192.168.200.5:/etc/kubernetes/pki/
scp /etc/kubernetes/pki/sa.* root@192.168.200.5:/etc/kubernetes/pki/
scp /etc/kubernetes/pki/front-proxy-ca.* root@192.168.200.5:/etc/kubernetes/pki/
scp /etc/kubernetes/pki/etcd/ca.* root@192.168.200.5:/etc/kubernetes/pki/etcd/
scp /etc/kubernetes/admin.conf root@192.168.200.5:/etc/kubernetes/
或者脚本执行
cat cert-main-master.sh
USER=root
CONTROL_PLANE_IPS="test-k8s-master-2 test-k8s-master-3"
for host in ${CONTROL_PLANE_IPS}; do
ssh "${USER}"@$host "mkdir -p /etc/kubernetes/pki/etcd"
scp /etc/kubernetes/pki/ca.* "${USER}"@$host:/etc/kubernetes/pki/
scp /etc/kubernetes/pki/sa.* "${USER}"@$host:/etc/kubernetes/pki/
scp /etc/kubernetes/pki/front-proxy-ca.* "${USER}"@$host:/etc/kubernetes/pki/
scp /etc/kubernetes/pki/etcd/ca.* "${USER}"@$host:/etc/kubernetes/pki/etcd/
scp /etc/kubernetes/admin.conf "${USER}"@$host:/etc/kubernetes/
done
33、把 master 主节点的 admin.conf 复制到其他 node 节点
scp /etc/kubernetes/admin.conf root@192.168.200.6:/etc/kubernetes/
34、master节点加入集群执行以下命令
kubeadm join 192.168.200.16:16443 --token abcdef.0123456789abcdef \
    --discovery-token-ca-cert-hash sha256:f0489748e3b77a9a29443dae2c4c0dfe6ff4bde0daf3ca8740dd9ab6a9693a78 \
    --control-plane
35、node节点加入集群执行以下命令
kubeadm join 192.168.200.16:16443 --token abcdef.0123456789abcdef \
    --discovery-token-ca-cert-hash sha256:f0489748e3b77a9a29443dae2c4c0dfe6ff4bde0daf3ca8740dd9ab6a9693a78
36、所有master节点执行以下命令,node节点随意
root用户执行以下命令
echo "export KUBECONFIG=/etc/kubernetes/admin.conf" >> ~/.bash_profile
source .bash_profile
非root用户执行以下命令
mkdir -p $HOME/.kube
sudo cp -i /etc/kubernetes/admin.conf $HOME/.kube/config
sudo chown $(id -u):$(id -g) $HOME/.kube/config
37、查看所有节点状态
[root@master1 ~]# kubectl get nodes
NAME      STATUS     ROLES    AGE     VERSION
master1   NotReady   master   4m54s   v1.18.2
master2   NotReady   master   2m27s   v1.18.2
master3   NotReady   master   93s     v1.18.2
node1     NotReady   <none>   76s     v1.18.2
38、安装网络插件
kubectl apply -f https://raw.githubusercontent.com/coreos/flannel/master/Documentation/kube-flannel.yml
或者使用Calico的CNI插件
kubectl apply -f https://docs.projectcalico.org/manifests/calico.yaml
39、查看节点状态
[root@master1 ~]# kubectl get nodes
NAME      STATUS   ROLES    AGE   VERSION
master1   Ready    master   39m   v1.18.2
master2   Ready    master   37m   v1.18.2
master3   Ready    master   36m   v1.18.2
node1     Ready    <none>   35m   v1.18.2
修改node规则
kubectl label no k8s-worker-1 kubernetes.io/role=worker
kubectl label no k8s-worker-2 kubernetes.io/role=worker
kubectl label no k8s-worker-3 kubernetes.io/role=worker
40、下载etcdctl客户端命令行工具
wget https://github.com/etcd-io/etcd/releases/download/v3.4.14/etcd-v3.4.14-linux-amd64.tar.gz
41、解压并加入环境变量
tar -zxf etcd-v3.4.14-linux-amd64.tar.gz
mv etcd-v3.4.14-linux-amd64/etcdctl /usr/local/bin
chmod +x /usr/local/bin/
42、验证etcdctl是否能用,出现以下结果代表已经成功了
[root@master1 ~]# etcdctl
NAME:
	etcdctl - A simple command line client for etcd3.

USAGE:
	etcdctl [flags]

VERSION:
	3.4.14

API VERSION:
	3.4


COMMANDS:
	alarm disarm		Disarms all alarms
	alarm list		Lists all alarms
	auth disable		Disables authentication
	auth enable		Enables authentication
	check datascale		Check the memory usage of holding data for different workloads on a given server endpoint.
	check perf		Check the performance of the etcd cluster
	compaction		Compacts the event history in etcd
	defrag			Defragments the storage of the etcd members with given endpoints
	del			Removes the specified key or range of keys [key, range_end)
	elect			Observes and participates in leader election
	endpoint hashkv		Prints the KV history hash for each endpoint in --endpoints
	endpoint health		Checks the healthiness of endpoints specified in `--endpoints` flag
	endpoint status		Prints out the status of endpoints specified in `--endpoints` flag
	get			Gets the key or a range of keys
	help			Help about any command
	lease grant		Creates leases
	lease keep-alive	Keeps leases alive (renew)
	lease list		List all active leases
	lease revoke		Revokes leases
	lease timetolive	Get lease information
	lock			Acquires a named lock
	make-mirror		Makes a mirror at the destination etcd cluster
	member add		Adds a member into the cluster
	member list		Lists all members in the cluster
	member promote		Promotes a non-voting member in the cluster
	member remove		Removes a member from the cluster
	member update		Updates a member in the cluster
	migrate			Migrates keys in a v2 store to a mvcc store
	move-leader		Transfers leadership to another etcd cluster member.
	put			Puts the given key into the store
	role add		Adds a new role
	role delete		Deletes a role
	role get		Gets detailed information of a role
	role grant-permission	Grants a key to a role
	role list		Lists all roles
	role revoke-permission	Revokes a key from a role
	snapshot restore	Restores an etcd member snapshot to an etcd directory
	snapshot save		Stores an etcd node backend snapshot to a given file
	snapshot status		Gets backend snapshot status of a given file
	txn			Txn processes all the requests in one transaction
	user add		Adds a new user
	user delete		Deletes a user
	user get		Gets detailed information of a user
	user grant-role		Grants a role to a user
	user list		Lists all users
	user passwd		Changes password of user
	user revoke-role	Revokes a role from a user
	version			Prints the version of etcdctl
	watch			Watches events stream on keys or prefixes

OPTIONS:
      --cacert=""				verify certificates of TLS-enabled secure servers using this CA bundle
      --cert=""					identify secure client using this TLS certificate file
      --command-timeout=5s			timeout for short running command (excluding dial timeout)
      --debug[=false]				enable client-side debug logging
      --dial-timeout=2s				dial timeout for client connections
  -d, --discovery-srv=""			domain name to query for SRV records describing cluster endpoints
      --discovery-srv-name=""			service name to query when using DNS discovery
      --endpoints=[127.0.0.1:2379]		gRPC endpoints
  -h, --help[=false]				help for etcdctl
      --hex[=false]				print byte strings as hex encoded strings
      --insecure-discovery[=true]		accept insecure SRV records describing cluster endpoints
      --insecure-skip-tls-verify[=false]	skip server certificate verification (CAUTION: this option should be enabled only for testing purposes)
      --insecure-transport[=true]		disable transport security for client connections
      --keepalive-time=2s			keepalive time for client connections
      --keepalive-timeout=6s			keepalive timeout for client connections
      --key=""					identify secure client using this TLS key file
      --password=""				password for authentication (if this option is used, --user option shouldn't include password)
      --user=""					username[:password] for authentication (prompt if password is not supplied)
  -w, --write-out="simple"			set the output format (fields, json, protobuf, simple, table)
43、查看etcd高可用集群健康状态
[root@master1 ~]# ETCDCTL_API=3 etcdctl --cacert=/etc/kubernetes/pki/etcd/ca.crt --cert=/etc/kubernetes/pki/etcd/peer.crt --key=/etc/kubernetes/pki/etcd/peer.key --write-out=table --endpoints=192.168.200.3:2379,192.168.200.4:2379,192.168.200.5:2379 endpoint health
+--------------------+--------+-------------+-------+
|      ENDPOINT      | HEALTH |    TOOK     | ERROR |
+--------------------+--------+-------------+-------+
| 192.168.200.3:2379 |   true | 60.655523ms |       |
| 192.168.200.4:2379 |   true |  60.79081ms |       |
| 192.168.200.5:2379 |   true | 63.585221ms |       |
+--------------------+--------+-------------+-------+
44、查看etcd高可用集群列表
[root@master1 ~]# ETCDCTL_API=3 etcdctl --cacert=/etc/kubernetes/pki/etcd/ca.crt --cert=/etc/kubernetes/pki/etcd/peer.crt --key=/etc/kubernetes/pki/etcd/peer.key --write-out=table --endpoints=192.168.200.3:2379,192.168.200.4:2379,192.168.200.5:2379 member list
+------------------+---------+---------+----------------------------+----------------------------+------------+
|        ID        | STATUS  |  NAME   |         PEER ADDRS         |        CLIENT ADDRS        | IS LEARNER |
+------------------+---------+---------+----------------------------+----------------------------+------------+
| 4a8537d90d14a19b | started | master1 | https://192.168.200.3:2380 | https://192.168.200.3:2379 |      false |
| 4f48f36de1949337 | started | master2 | https://192.168.200.4:2380 | https://192.168.200.4:2379 |      false |
| 88fb5c8676da6ea1 | started | master3 | https://192.168.200.5:2380 | https://192.168.200.5:2379 |      false |
+------------------+---------+---------+----------------------------+----------------------------+------------+
45、查看etcd高可用集群leader
[root@master1 ~]# ETCDCTL_API=3 etcdctl --cacert=/etc/kubernetes/pki/etcd/ca.crt --cert=/etc/kubernetes/pki/etcd/peer.crt --key=/etc/kubernetes/pki/etcd/peer.key --write-out=table --endpoints=192.168.200.3:2379,192.168.200.4:2379,192.168.200.5:2379 endpoint status
+--------------------+------------------+---------+---------+-----------+------------+-----------+------------+--------------------+--------+
|      ENDPOINT      |        ID        | VERSION | DB SIZE | IS LEADER | IS LEARNER | RAFT TERM | RAFT INDEX | RAFT APPLIED INDEX | ERRORS |
+--------------------+------------------+---------+---------+-----------+------------+-----------+------------+--------------------+--------+
| 192.168.200.3:2379 | 4a8537d90d14a19b |   3.4.3 |  2.8 MB |      true |      false |         7 |       2833 |               2833 |        |
| 192.168.200.4:2379 | 4f48f36de1949337 |   3.4.3 |  2.7 MB |     false |      false |         7 |       2833 |               2833 |        |
| 192.168.200.5:2379 | 88fb5c8676da6ea1 |   3.4.3 |  2.7 MB |     false |      false |         7 |       2833 |               2833 |        |
+--------------------+------------------+---------+---------+-----------+------------+-----------+------------+--------------------+--------+
46、部署k8s的dashboard
1.1、下载recommended.yaml文件
wget https://raw.githubusercontent.com/kubernetes/dashboard/v2.0.0/aio/deploy/recommended.yaml
1.2、修改recommended.yaml文件
---
kind: Service
apiVersion: v1
metadata:
  labels:
    k8s-app: kubernetes-dashboard
  name: kubernetes-dashboard
  namespace: kubernetes-dashboard
spec:
  type: NodePort #增加
  ports:
    - port: 443
      targetPort: 8443
      nodePort: 30000 #增加
  selector:
    k8s-app: kubernetes-dashboard
---
1.3、创建证书
mkdir dashboard-certs

cd dashboard-certs/

#创建命名空间
kubectl create namespace kubernetes-dashboard

# 创建key文件
openssl genrsa -out dashboard.key 2048

#证书请求
openssl req -days 36000 -new -out dashboard.csr -key dashboard.key -subj '/CN=dashboard-cert'

#自签证书
openssl x509 -req -in dashboard.csr -signkey dashboard.key -out dashboard.crt

#创建kubernetes-dashboard-certs对象
kubectl create secret generic kubernetes-dashboard-certs --from-file=dashboard.key --from-file=dashboard.crt -n kubernetes-dashboard
1.4、安装dashboard (如果报错:Error from server (AlreadyExists): error when creating "./recommended.yaml": namespaces "kubernetes-dashboard" already exists这个忽略不计,不影响。)
kubectl apply -f recommended.yaml
1.5、查看安装结果
[root@master1 ~]# kubectl get pods -A  -o wide
NAMESPACE              NAME                                         READY   STATUS    RESTARTS   AGE   IP              NODE      NOMINATED NODE   READINESS GATES
kube-system            coredns-66bff467f8-b97kc                     1/1     Running   0          16h   10.244.0.2      master1   <none>           <none>
kube-system            coredns-66bff467f8-w2bbp                     1/1     Running   0          16h   10.244.1.2      master2   <none>           <none>
kube-system            etcd-master1                                 1/1     Running   1          16h   192.168.200.3   master1   <none>           <none>
kube-system            etcd-master2                                 1/1     Running   2          16h   192.168.200.4   master2   <none>           <none>
kube-system            etcd-master3                                 1/1     Running   1          16h   192.168.200.5   master3   <none>           <none>
kube-system            kube-apiserver-master1                       1/1     Running   2          16h   192.168.200.3   master1   <none>           <none>
kube-system            kube-apiserver-master2                       1/1     Running   2          16h   192.168.200.4   master2   <none>           <none>
kube-system            kube-apiserver-master3                       1/1     Running   2          16h   192.168.200.5   master3   <none>           <none>
kube-system            kube-controller-manager-master1              1/1     Running   3          16h   192.168.200.3   master1   <none>           <none>
kube-system            kube-controller-manager-master2              1/1     Running   2          16h   192.168.200.4   master2   <none>           <none>
kube-system            kube-controller-manager-master3              1/1     Running   1          16h   192.168.200.5   master3   <none>           <none>
kube-system            kube-flannel-ds-6wbrh                        1/1     Running   0          83m   192.168.200.5   master3   <none>           <none>
kube-system            kube-flannel-ds-gn2md                        1/1     Running   1          16h   192.168.200.4   master2   <none>           <none>
kube-system            kube-flannel-ds-rft78                        1/1     Running   1          16h   192.168.200.3   master1   <none>           <none>
kube-system            kube-flannel-ds-vkxfw                        1/1     Running   0          54m   192.168.200.6   node1     <none>           <none>
kube-system            kube-proxy-7p72p                             1/1     Running   2          16h   192.168.200.4   master2   <none>           <none>
kube-system            kube-proxy-g44fx                             1/1     Running   1          16h   192.168.200.3   master1   <none>           <none>
kube-system            kube-proxy-nwnzf                             1/1     Running   1          16h   192.168.200.6   node1     <none>           <none>
kube-system            kube-proxy-xxmgl                             1/1     Running   1          16h   192.168.200.5   master3   <none>           <none>
kube-system            kube-scheduler-master1                       1/1     Running   3          16h   192.168.200.3   master1   <none>           <none>
kube-system            kube-scheduler-master2                       1/1     Running   2          16h   192.168.200.4   master2   <none>           <none>
kube-system            kube-scheduler-master3                       1/1     Running   1          16h   192.168.200.5   master3   <none>           <none>
kubernetes-dashboard   dashboard-metrics-scraper-6b4884c9d5-sn2rd   1/1     Running   0          14m   10.244.3.5      node1     <none>           <none>
kubernetes-dashboard   kubernetes-dashboard-7b544877d5-mxfp2        1/1     Running   0          14m   10.244.3.4      node1     <none>           <none>


[root@master1 ~]# kubectl get service -n kubernetes-dashboard  -o wide
NAME                        TYPE        CLUSTER-IP      EXTERNAL-IP   PORT(S)         AGE   SELECTOR
dashboard-metrics-scraper   ClusterIP   10.97.196.112   <none>        8000/TCP        14m   k8s-app=dashboard-metrics-scraper
kubernetes-dashboard        NodePort    10.100.10.34    <none>        443:30000/TCP   14m   k8s-app=kubernetes-dashboard
1.6、创建dashboard管理员
vim dashboard-admin.yaml
apiVersion: v1
kind: ServiceAccount
metadata:
  labels:
    k8s-app: kubernetes-dashboard
  name: dashboard-admin
  namespace: kubernetes-dashboard
1.7、部署dashboard-admin.yaml文件
kubectl apply -f dashboard-admin.yaml
1.8、为用户分配权限
vim dashboard-admin-bind-cluster-role.yaml
apiVersion: rbac.authorization.k8s.io/v1
kind: ClusterRoleBinding
metadata:
  name: dashboard-admin-bind-cluster-role
  labels:
    k8s-app: kubernetes-dashboard
roleRef:
  apiGroup: rbac.authorization.k8s.io
  kind: ClusterRole
  name: cluster-admin
subjects:
- kind: ServiceAccount
  name: dashboard-admin
  namespace: kubernetes-dashboard
1.9、部署dashboard-admin-bind-cluster-role.yaml
kubectl apply -f dashboard-admin-bind-cluster-role.yaml
2.0、查看并复制用户Token
[root@master1 ~]# kubectl -n kubernetes-dashboard describe secret $(kubectl -n kubernetes-dashboard get secret | grep dashboard-admin | awk '{print $1}')
Name:         dashboard-admin-token-f5ljr
Namespace:    kubernetes-dashboard
Labels:       <none>
Annotations:  kubernetes.io/service-account.name: dashboard-admin
              kubernetes.io/service-account.uid: 95741919-e296-498e-8e10-233c4a34b07a

Type:  kubernetes.io/service-account-token

Data
====
ca.crt:     1025 bytes
namespace:  20 bytes
token:      eyJhbGciOiJSUzI1NiIsImtpZCI6Iko5TVI0VVQ2TndBSlBLc2Rxby1CWGxSNHlxYXREWGdVOENUTFVKUmFGakEifQ.eyJpc3MiOiJrdWJlcm5ldGVzL3NlcnZpY2VhY2NvdW50Iiwia3ViZXJuZXRlcy5pby9zZXJ2aWNlYWNjb3VudC9uYW1lc3BhY2UiOiJrdWJlcm5ldGVzLWRhc2hib2FyZCIsImt1YmVybmV0ZXMuaW8vc2VydmljZWFjY291bnQvc2VjcmV0Lm5hbWUiOiJkYXNoYm9hcmQtYWRtaW4tdG9rZW4tZjVsanIiLCJrdWJlcm5ldGVzLmlvL3NlcnZpY2VhY2NvdW50L3NlcnZpY2UtYWNjb3VudC5uYW1lIjoiZGFzaGJvYXJkLWFkbWluIiwia3ViZXJuZXRlcy5pby9zZXJ2aWNlYWNjb3VudC9zZXJ2aWNlLWFjY291bnQudWlkIjoiOTU3NDE5MTktZTI5Ni00OThlLThlMTAtMjMzYzRhMzRiMDdhIiwic3ViIjoic3lzdGVtOnNlcnZpY2VhY2NvdW50Omt1YmVybmV0ZXMtZGFzaGJvYXJkOmRhc2hib2FyZC1hZG1pbiJ9.tP3EFBeOIJg7_cgJ-M9SDqTtPcfmoJU0nTTGyb8Sxag6Zq4K-g1lCiDqIFbVgrd-4nM7cOTMBfMwyKgdf_Xz573omNNrPDIJCTYkNx2qFN0qfj5qp8Txia3JV8FKRdrmqsap11ItbGD9a7uniIrauc6JKPgksK_WvoXZbKglEUla98ZU9PDm5YXXq8STyUQ6egi35vn5EYCPa-qkUdecE-0N06ZbTFetIYsHEnpswSu8LZZP_Zw7LEfnX9IVdl1147i4OpF4ET9zBDfcJTSr-YE7ILuv1FDYvvo1KAtKawUbGu9dJxsObLeTh5fHx_JWyqg9cX0LB3Gd1ZFm5z5s4g
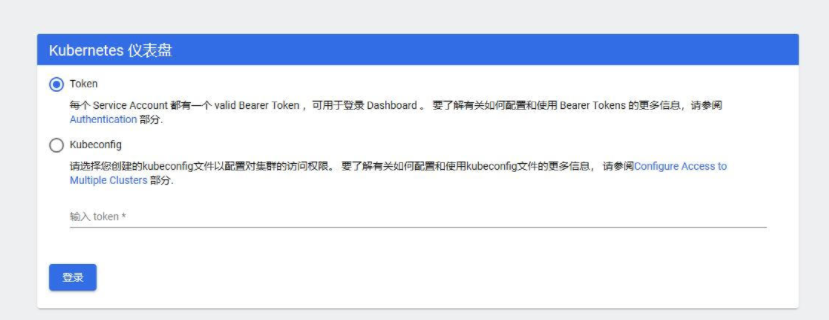
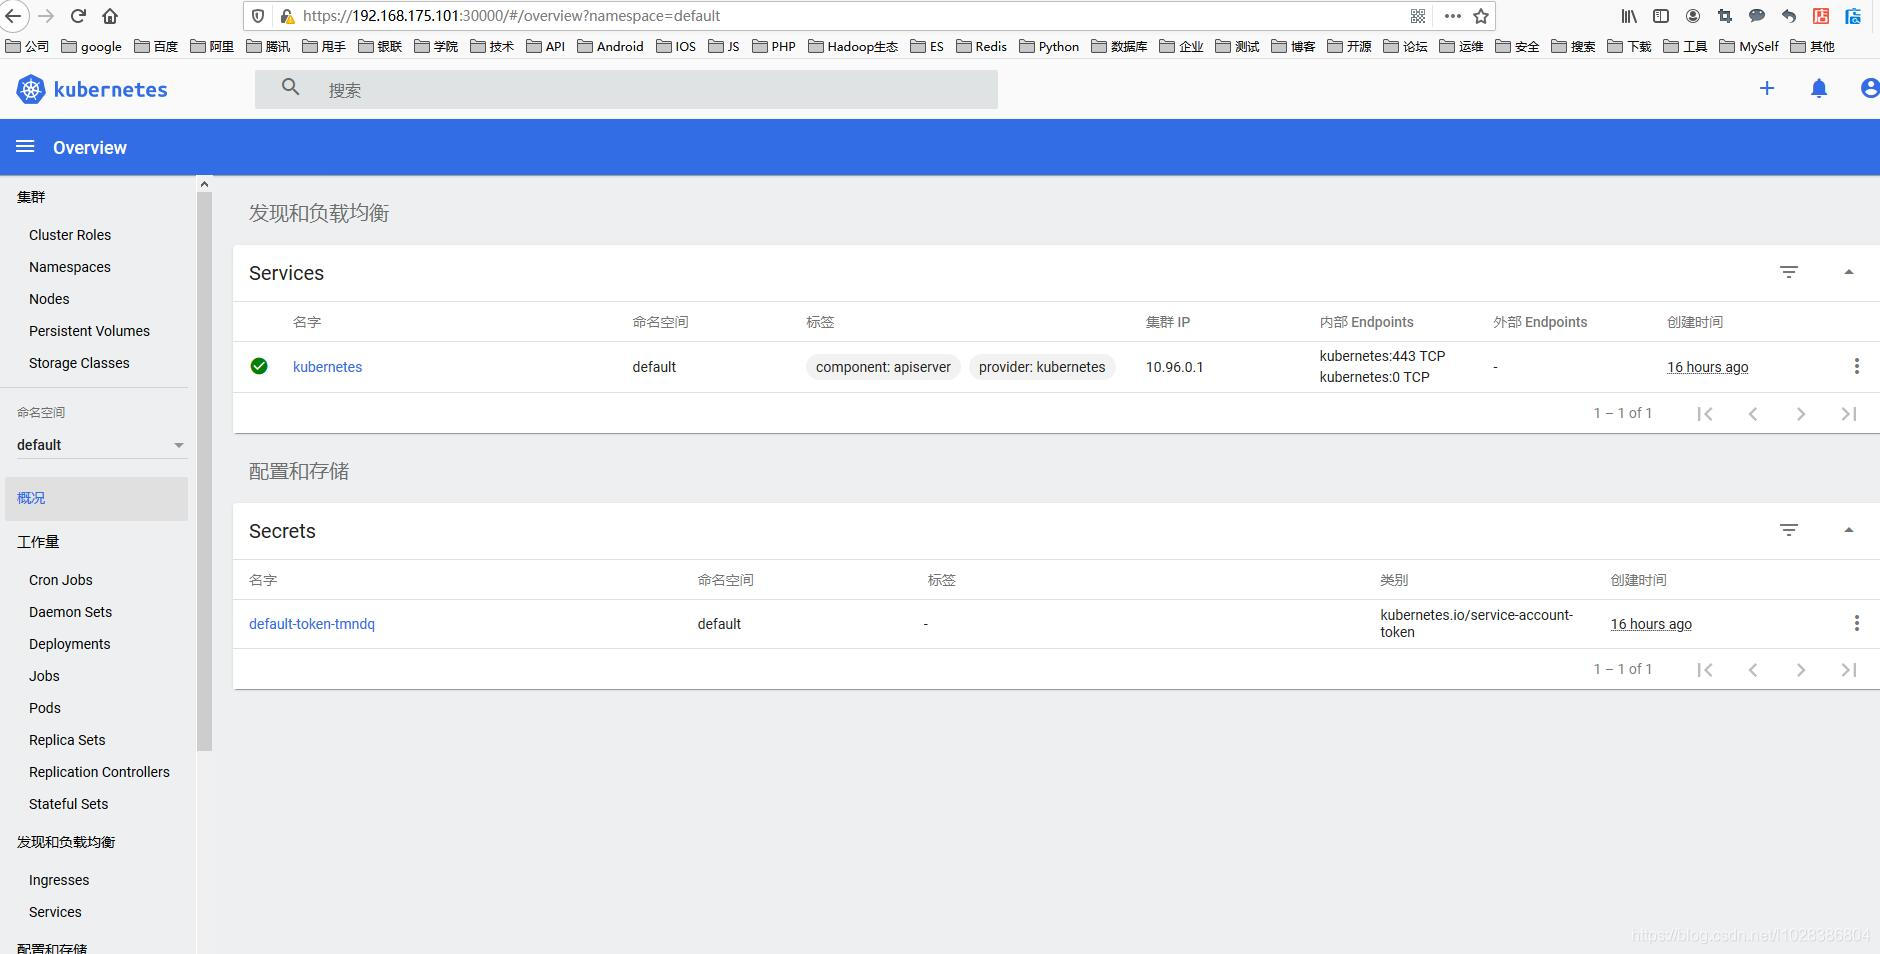
2.1、复制token并访问dashboard
ip:30000
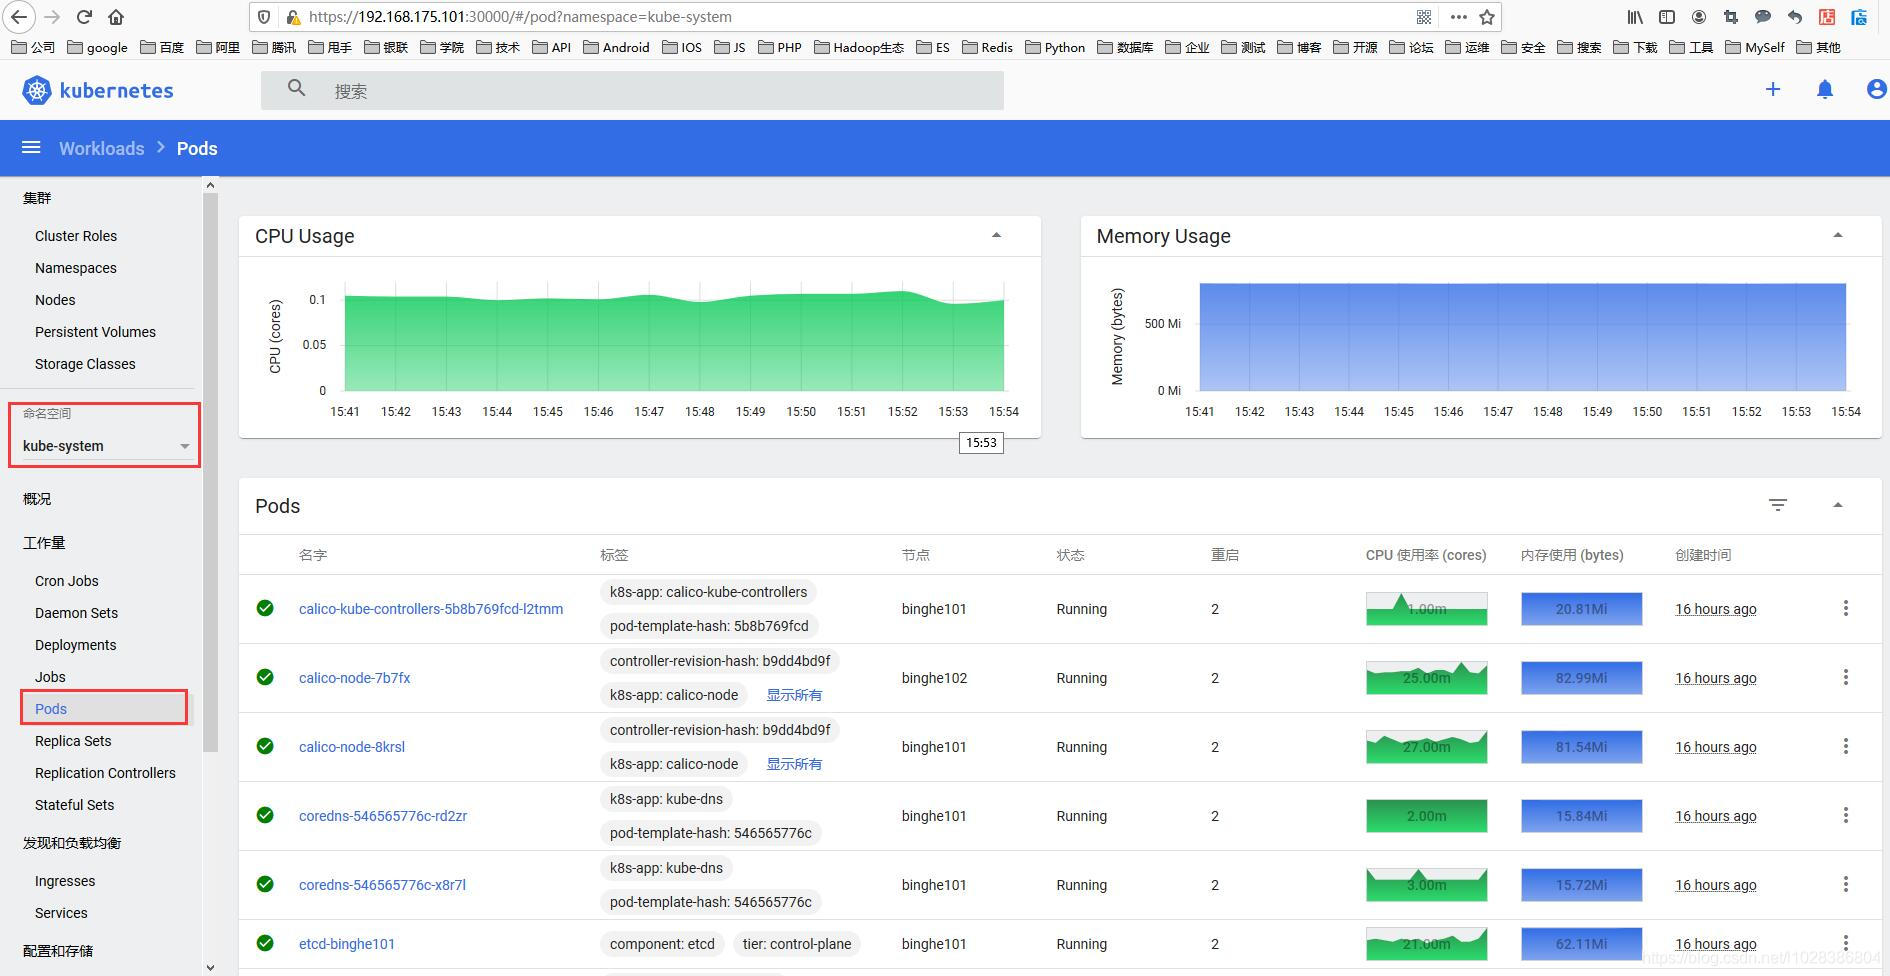
默认k8s的master节点是不能跑pod的业务,需要执行以下命令解除限制
kubectl taint nodes --all node-role.kubernetes.io/master-


